A Friendly Guide to How Your Code Becomes a Program
Introduction
Have you ever wondered what happens when you hit the “Run” button on your Java program? How does your neatly written code turn into something the computer can actually execute? Let’s take a journey through the life of a Java program, from the moment you write your first line of code to when it becomes a running application. We’ll explore each step and even peek under the hood to see what happens at the bytecode and machine code levels. Don’t worry—we’ll keep things simple, friendly, and easy to understand!
Step 1: Writing the Source Code
Everything starts with the source code, which is the Java code you write in files with a .java extension. Here’s an example:
package org.example;

public class HelloWorld {
    public static void main(String[] args) {
        System.out.println("Hello, World!");
    }
}
This code is just plain text, but it’s written in a specific language—Java—that both humans and computers can understand (with a little help from some tools, which we’ll get into shortly).
Step 2: Compilation to Bytecode
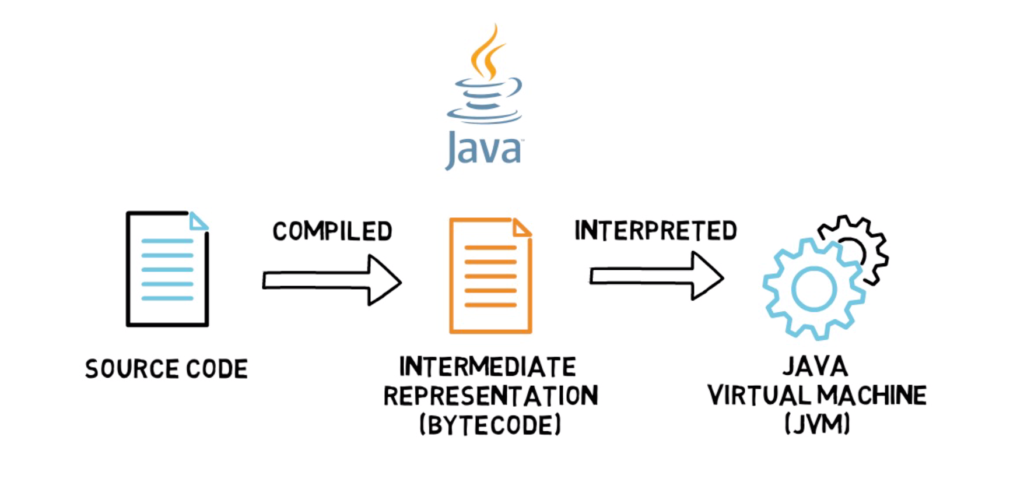
Once you’ve written your code, the next step is to compile it. Compilation is the process of turning your human-readable Java code into something the computer can understand more directly. But instead of turning it into machine code right away, Java compiles your code into bytecode.
Here’s how it works:
- Java Compiler (
javac): When you run thejavaccommand, the Java compiler reads your.javafile and converts it into a.classfile containing bytecode. - Bytecode: This is a set of instructions that look almost like machine code but aren’t tied to any specific type of computer. It’s a universal language for the Java Virtual Machine (JVM).
Here’s how you’d compile our HelloWorld.java example:
javac HelloWorld.java
This command generates a HelloWorld.class file. This .class file is not yet something your computer can run directly, but it’s getting closer!
Let’s take a look at what this bytecode might look like. You can use the javap -c org.example.HelloWorld command to disassemble the bytecode and see its contents:
javap -c org.example.HelloWorld
This would output something like:
public class org.example.HelloWorld {
  public org.example.HelloWorld();
    Code:
       0: aload_0
       1: invokespecial #1                  // Method java/lang/Object."<init>":()V
       4: return

  public static void main(java.lang.String[]);
    Code:
       0: getstatic     #7                  // Field java/lang/System.out:Ljava/io/PrintStream;
       3: ldc           #13                 // String Hello, World!
       5: invokevirtual #15                 // Method java/io/PrintStream.println:(Ljava/lang/String;)V
       8: return
}
Understanding the Bytecode
This bytecode might look cryptic, but let’s break it down:
- aload_0: This loads a reference to the current object (
this) onto the stack. - invokespecial: Calls the special method, in this case, the constructor
Object.<init>(), which initializes theHelloWorldobject. - getstatic: Fetches a static field from the class, here it’s
System.out, which is the standard output stream. - ldc: Pushes a constant value onto the stack, here it’s the string
"Hello, World!". - invokevirtual: Calls an instance method, in this case,
PrintStream.println()which prints the string to the console. - return: Exits the method.
This is the intermediate representation of your program that the JVM can understand.
Step 3: Interpretation by the JVM
Now that you have bytecode, it’s time to run it. But wait—your computer still doesn’t speak bytecode! That’s where the Java Virtual Machine (JVM) comes in.
- JVM: The JVM is like an interpreter that reads the bytecode and translates it into machine code that your computer can execute. When you run the
javacommand, the JVM starts up, loads your bytecode, and begins interpreting it line by line.
java org.example.HelloWorld
During interpretation, the JVM reads each bytecode instruction and executes the corresponding native machine instructions. For example:
- The
getstaticbytecode might translate into a machine instruction that loads the memory address ofSystem.out. - The
invokevirtualmight translate into a series of instructions that jump to the memory address of theprintlnmethod and execute it.
This step is dynamic, meaning the JVM interprets the bytecode as it runs, translating it into machine instructions on the fly.
Step 4: Just-In-Time Compilation (JIT)
But interpretation, while flexible, isn’t the fastest way to execute code. The JVM can do something even smarter: Just-In-Time (JIT) Compilation.
- JIT Compilation: As the JVM interprets your bytecode, it looks for pieces of code that are run frequently. When it finds these “hot spots,” it compiles them into native machine code on the fly—just in time for execution. This compiled machine code can be run directly by the computer, making the program run faster.
So, in our HelloWorld example, the JVM might decide that the System.out.println("Hello, World!"); line is run often enough to compile it directly to machine code. The next time this line is needed, the JVM uses the pre-compiled version, speeding up the execution.
Step 5: Execution and Beyond
Finally, once the JVM has interpreted and compiled the necessary parts of your program, it continues running your application. This process is dynamic, with the JVM constantly optimizing your code as it runs, ensuring it executes as efficiently as possible.
In summary, the journey from source to binary in Java involves several key steps:
- Writing Source Code: You start with human-readable Java code.
- Compilation to Bytecode: The Java compiler turns your code into platform-independent bytecode.
- Interpretation by the JVM: The JVM reads and interprets the bytecode, converting it into machine code as needed.
- JIT Compilation: The JVM further optimizes by compiling frequently-used code into native machine code on the fly.
- Execution: Your program runs smoothly, with the JVM ensuring it performs well.

Java’s journey from source code to a running application is a fascinating process that balances portability and performance. By compiling to bytecode and using the JVM’s interpretation and JIT compilation, Java can run efficiently on any machine with a JVM. Whether you’re just printing “Hello, World!” or building a complex application, understanding this process helps you appreciate the power and flexibility that Java brings to the table.


Leave a Reply